STEM OPTIONAL PRACTICAL TRAINING (OPT) INSTRUCTIONS
Congratulations on completing the online OPT workshop! These OPT INSTRUCTIONS will serve as
your guide and frequent reference in completing your OPT application.
Table of Contents
1. Important Timelines and Deadlines
2. The STEM OPT application checklist
3. Appendix A: Sample Completed I-765
4. Appendix B: Photograph Requirements
• Earliest date you can request the STEM OPT Extension is 90 days before the current OPT
authorization end date (date listed on current EAD card).
• Latest start date you can request is the day of the current OPT authorization end date
(date listed on current EAD card).
USCIS will not accept applications received after the expiration
of your current EAD Card.
1. Important Timelines and Deadlines
Start preparing your OPT application while you wait for OIPS to process your STEM OPT I-20
request (https://oips.gmu.edu/stem-opt-extension/ ). Your OPT Application includes your STEM
OPT I-20, I-765 application to USCIS, payment, and supporting documents. Follow the
instructions below carefully to complete your application.
Step 3 Checklist Detailed Instructions
1. Review the USICS Webpage Form Filing Tips at https://www.uscis.gov/forms-filing-tips.
The instructions below are from this webpage. See the link for official information.
• When possible, download the form from the USCIS website and complete it with a computer.
• If you hand write your answers, use black ink. Make sure your entries are neat, legible, and within
the space provided.
• We use special scanners to read your forms and documents. The scanners will not properly read
information that is greyed out, highlighted or corrected using correction fluid or tape.
• If you make an error, start over with a clean form
Click on the
box when step
is completed
Step 3 Checklist: Prepare OPT Application
☐
1. Review the USCIS web page Form Filing Tips at
https://www.uscis.gov/forms-filing-tips (detailed instructions
below).
☐
2. Complete and sign USCIS form I-765. (Detailed instructions
below).
☐
3. Complete and sign USCIS form G-1145
☐
4. Make copies of all required documents.
☐
5. Purchase new official photographs
☐
6. Prepare payment – OPT application fee.
☐
7. Review OPT application.
2. STEM OPT APPLICATION
Prepare OPT Application
2. Complete and sign USCIS form I-765. The instructions below have been adapted from
https://www.uscis.gov/i-765. See the link for official instructions.
Also see Appendix A, Sample Completed I-765 for additional help completing the form.
General Instructions
• Download USCIS form I-765 at https://www.uscis.gov/i-765
• If you are using a Mac, you should use Safari to open, fill out the form I-765 and print. If you use
Firefox, first download the PDF form to the desktop (or your 'Downloads' folder), then open it
with Acrobat Reader 9 or higher (NOT Preview). You cannot open the PDF form from the
'Download' window of Firefox.
• Complete the form with a computer. If you handwrite your answers, use black ink.
• If a question does not apply to you, type or print “N/A” or “NA” unless otherwise directed. If your
answer to a question requires a number and it does not apply to you, type or print “None” unless
otherwise directed.

Step by Step Instructions
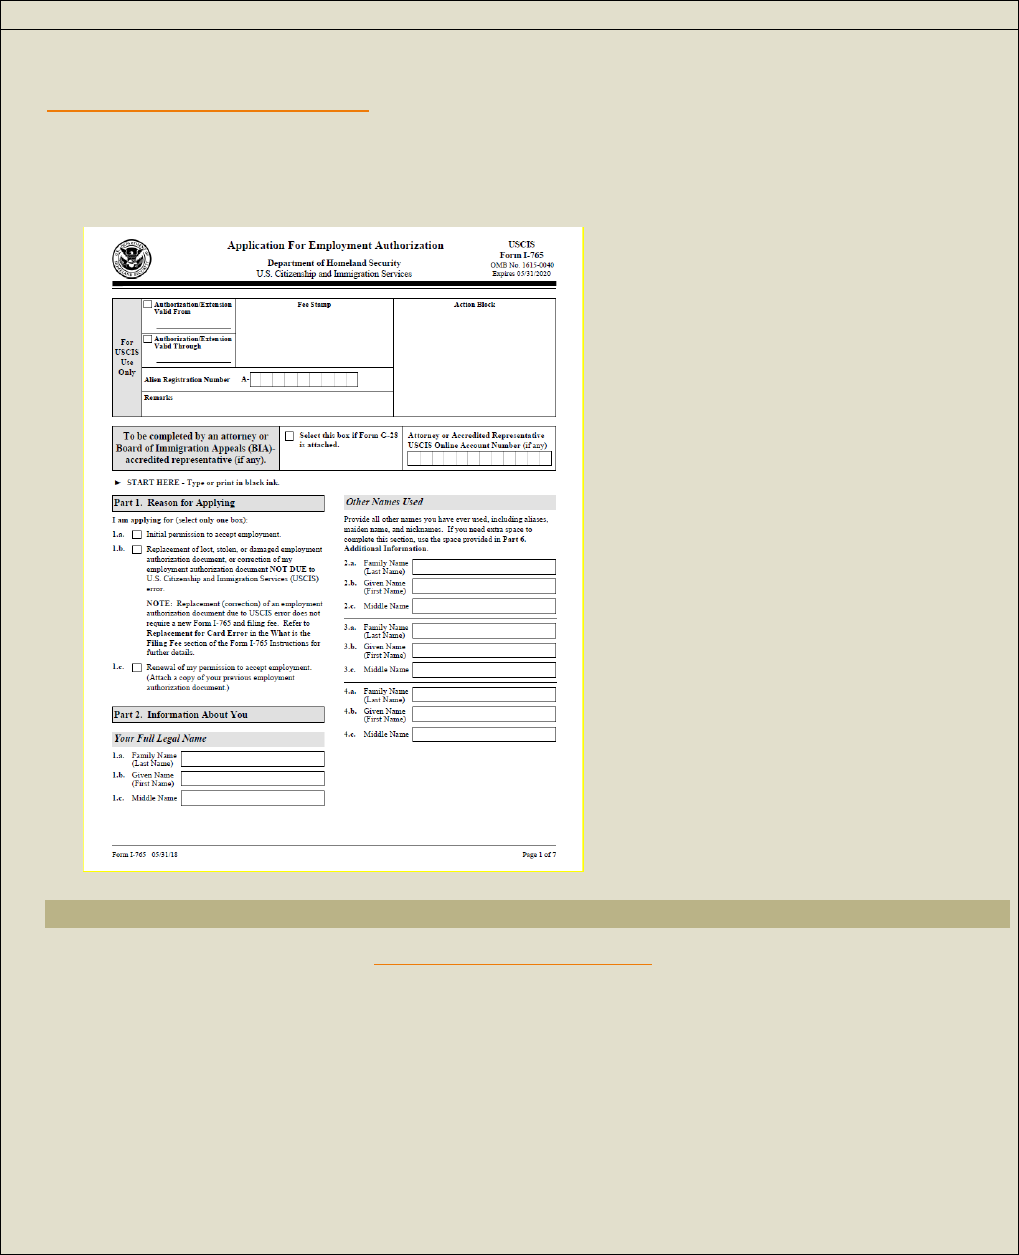
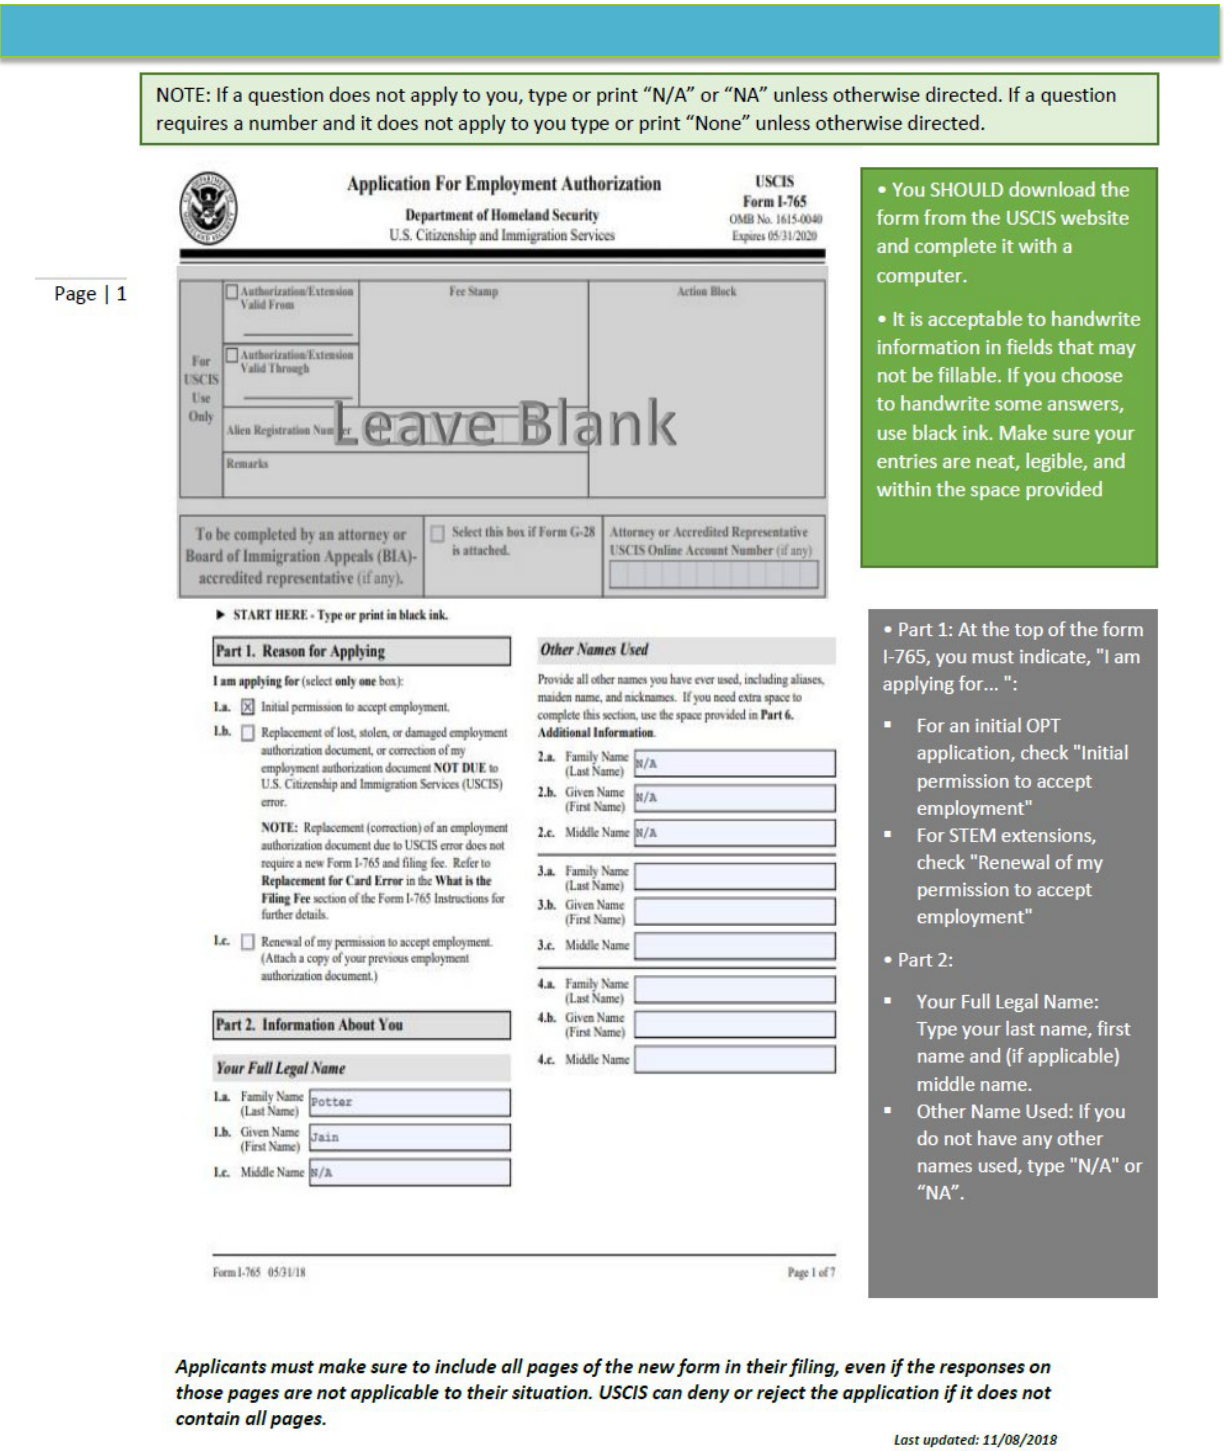
Part 1. Reason for Applying
I am applying for
1.c. Choose 1.c. for a STEM extension
Part 2. Information about You
Your Full Legal Name
1.a.-1.c. Enter your last name, first name, and (if applicable) middle name.
Other Names Used
2.a.-4.c. Enter all other names you have used. If you do not have any other names, enter N/A.
Your U.S. Mailing Address
5.a.-5.e. Provide a valid mailing address in the United States. Keep in mind that the U.S.
government will not forward government mail. If returned for an incorrect address, your card
will be destroyed.
• You can list a valid U.S. residence, APO, or commercial address.
• You can list a U.S. Post Office (PO Box) if that is how you receive your mail.
• If your mail is sent to someone other than yourself, include an “In Care of Name”
• If you are planning to move during the time your application is with USCIS, you can use
the OIPS address. We will notify you to pick up your EAD card when it arrives. If you
choose to use the OIPS address, use the following format. (Do not forget to include
MSN4C3):
6. Choose YES if the address you entered in 5.a.-5.e. is the same as your physical address.
Choose NO if it is not.
U.S. Physical Address
7.a.-7.d. If you answered NO to 6., enter your complete physical address
Other Information
8. Enter your Alien Registration Number (A-number) if any. If you do not have an A-number
or cannot remember it, leave 8. blank. If you are renewing your EAD, this number may be
listed as the USCIS Number on the front of the card. If you have more than one A-Number,
use the space provided in Part 6. Additional Information. (Most F-1 students do not
have A-numbers. An Alien Registration Number (A-number) is typically issued to people
who apply for, or are granted, certain immigration benefits. In the addition to USCIS; ICE,
U.S. Customs and Border Protection (CBP), EOIR, and the DoS may also issue an A-Number
to certain foreign nationals).
9. If you have previously filed an application or petition using the USCIS online filing system
(previously called USCIS ELIS), provide the USCIS Online Account Number you were

issued by the system. If you do not have a USCIS Online Account Number or cannot
remember it, leave 9. Blank.
10. Choose the box that indicates if you are Male or Female.
11. Choose the box that describes the marital status you have on the date you file Form 1-765.
12. If you have applied for employment authorization in the past, choose YES and provide
copies of your previous EADs if available. If you have NOT applied for employment
authorization in the past, choose NO.
13. a.-13b. If the Social Security Administration (SSA) has ever issued a Social Security
number to you in your current name or a previously used name such as your maiden
name, choose YES for 13.a. and enter the social security number (SSN) from your card in
13.b. Otherwise, choose NO for 13.a.
14. Social Security Information
• If your request for employment authorization is approved, the SSA may assign you an
SSN and issue you a Social Security Card, or issue you a replacement card. You are not
required to request an SSN using this application. (Completing 14-17.b. is optional).
However, you must have an SSN properly assigned in your name to work in the United
States.
• If your employer uses E-Verify to confirm new employees’ eligibility to work legally in
the U.S., the information you provide on Form I-9, Employment Eligibility Verification,
will be compared to data in SSA and Department of Homeland Security (DHS)
databases. Employees must have an SSN in order for E-Verify to confirm their
eligibility to work legally in the U.S.
If you want the SSA to assign you an SSN and issue you a Social Security Card, answer YES
to 14.
15. If you answered YES to 14, also answer YES to 15 to authorize the SSA to receive
information about you from your I-765 application.
16. a.-17.b. If you answered YES to 14, enter information about your father’s and mother’s
family and given names at birth.
Your Country or Countries of Citizenship or Nationality
18. Enter the name of the country or countries where you are currently a citizen or national.
• If you are stateless, type or print the name of the country where you were last a citizen
or national.
• If you are a citizen or national of more than one country, enter the name of the foreign
country that issued your last passport.
Place of Birth

19a.-19.c. Enter the name of city, town, or village; state or province; and country where you
were born. Enter the name of the country as it was named when you were born, even if the
country no longer exists.
20. Enter you date of birth in mm/dd/yyyy format in the space provided. For example, enter
October 5, 1994 as 10/05/1994.
Information About Your Last Arrival in the United States
21.a. Enter your Form I-94 Number. Most students can find their I-94 Number by visiting the
CBP website at https://i94.cbp.dhs.gov. If you last entered the U.S. before April 30,
2013, you might have a paper version of the I-94. The Form I-94 Number is also known
as the Departure Number on some versions of the form.
21.b.-21.e Enter your passport or travel document number if you used one to travel to the
U.S., even if it is currently expired
21.b. Enter passport number
21.c. Enter travel document number if any
21.d. Enter Country that issued passport or travel document
21.e. Enter expiration date of passport or travel document
22. Enter the date that you last entered the U.S., using the mm/dd/yyyy format. See your I-94.
23. Enter the Place of your last arrival into the U.S. You can enter an airport code or airport
name. See your I-94.
24. Enter the letter and number that matches your current immigration status when you last
entered the U.S.. For example, if you were an F-1 student when you last entered the U.S.,
enter “F-1.”
25. Enter the letter and number that matches your current immigration status. For example, if
your current immigration status is F-1 student, enter “F-1.” If you have not changed your
status since you last entered the U.S., your entry for 25 and 26 should match.
26. Enter your SEVIS number from your OPT I-20.
Information About Your Eligibility Category
27. In the three boxes, enter the eligibility category based on your situation:
Pre-Completion OPT: (c) (3) (A)
Post-Completion OPT: (c) (3) (B)
STEM extension OPT: (c) (3) (C)
28.-28.c. If you entered eligibility category (c) (3) (C) in 27., enter your degree level, major
and CIP code (for example, Bachelor’s degree in Mathematics, 27.0101), your employer’s
name as listed in E-Verify, your employer’s E-Verify Company Identification Number, or a
valid E-Verify Client Company Identification Number.
29.-31.b. Skip these questions. They do not apply to F-1 students applying for OPT.

Part 3. Applicant’s Statement, Contact Information,
Declaration, Certification, and Signature
Applicant’s Statement
1.a. Choose 1.a. to indicate that you have read and understand all questions and answers in
this application.
1.b. Only choose 1.b. if you require an interpreter for help with all questions, instructions,
and answers. Enter the language that the interpreter used to communication. Students
who have completed a degree program in the U.S. should have the level of English
required to choose 1.a. instead.
2. Choose 2. if someone, an immigration lawyer or other representative, prepared this
application for you based on information that you provided or authorized. If you choose
2., you must complete Part 5.
Applicant’s Contact Information
3. Enter your daytime telephone number.
4. Enter your mobile telephone number if you have one.
5. Enter your email address if you have one.
6. Skip 6. Unless you are a Salvadoran or Guatemalan national eligible for benefits under
the ABC settlement .
Applicant’s Declaration and Certification
7.a. Read the declaration to understand what you are authorizing by signing your name in
7.b. Enter the date you signed Form I-765 using the mm/dd/yyyy format.
Part 4. Interpreter’s Contact Information, Certification, and Signature
1.a.-7.b. These questions do not typically apply to an F-1 student applying for OPT. If a
question does not apply to you, enter “N/A” unless otherwise directed. If a question
requires a number, enter “NONE” if it does not apply to you.
Part 5. Contact Information, Declaration, and Signature of the Person Preparing this
Application, If Other Than the Applicant.
1.a.-8.b. If someone prepared this application for you, enter the appropriate information. The
Preparer must read and complete 7.a. or 7.b. and sign and date 8.a. and 8.b. If you did
Not have someone prepare this application for you, these questions do not apply to you:
Enter “N/A” unless otherwise directed. If a question requires a number, enter “NONE.”
blue or black ink.
Part. 6. Additional Information
Use Part 6. to provide all previously used SEVIS numbers and evidence of any previously
authorized CPT or OPT and the Academic Level at which it was authorized. (If you need extra
space to provide additional information, you may make copies of Part 6. Make sure you
follow the instructions in Part 6 about what information needs to be included on your
copies.
1.a.-1.c. Enter your Family Name, Given Name, and Middle Name
2. Enter your A-Number if you have one.
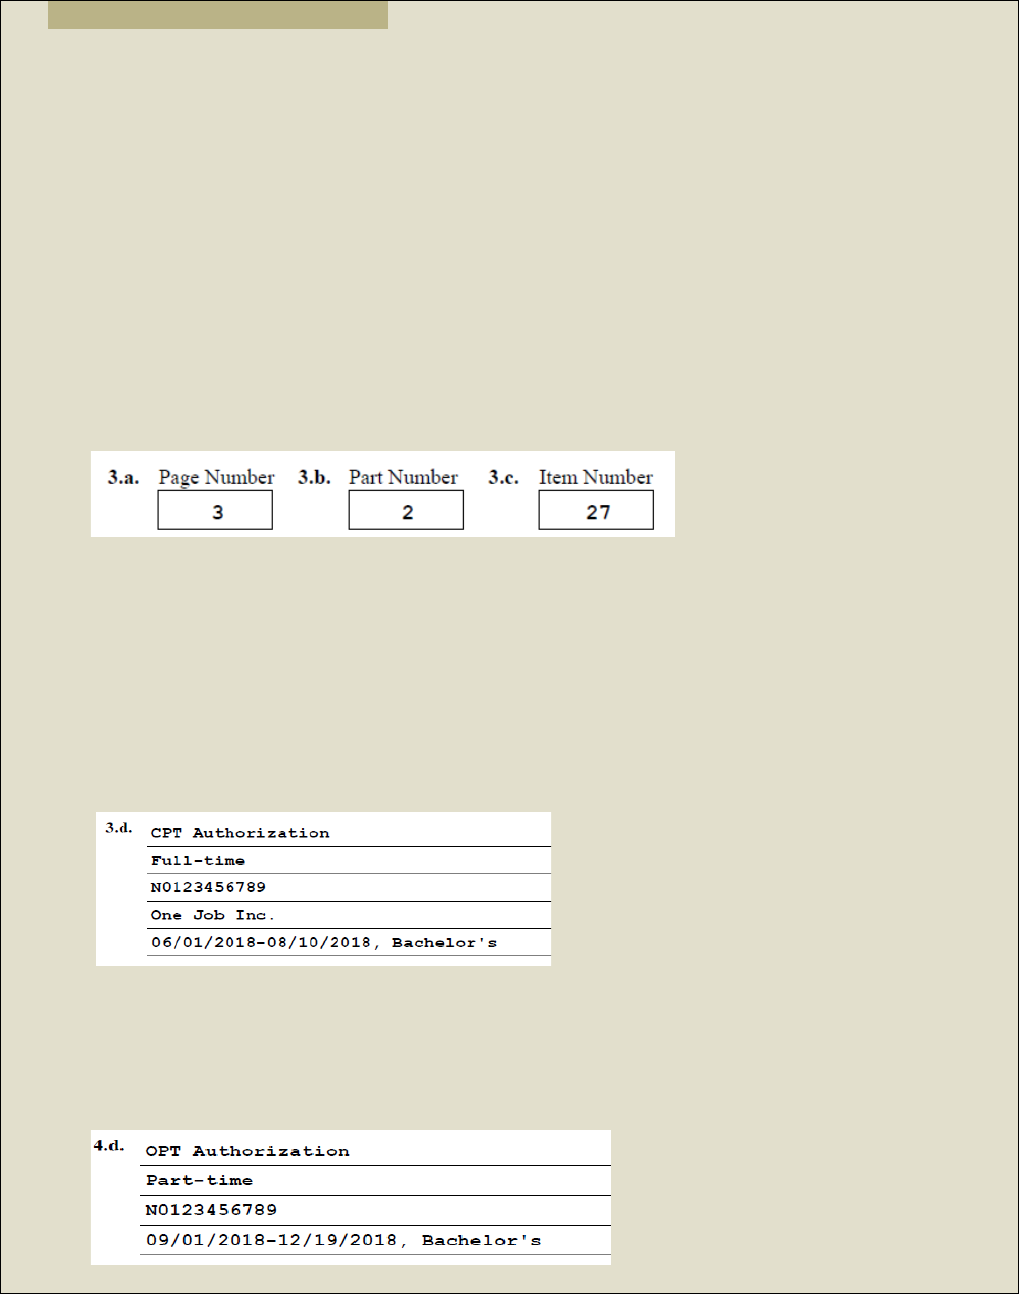
3.a.-3.b. Indicate the Page Number, Part Number, and Item Number to which your answer
refers. For example if you previously been approved for CPT and/or OPT, enter “Page 3,
Part 2, Item 27.”
3.d.
List any previous CPT or OPT authorizations you have had. Use separate fields for each
(for example, list all previous CPTs in 3.d., all previous OPTs in 4.d., etc.) You can find
your previous CPT/OPT authorization details on your CPT/OPT I-20s.
Use the following format: CPT Authorization as the title; whether the authorization was
full-time (more than 20 hours per week); part-time (20 hours or fewer per week); SEVIS
ID number; employer name; employment start and end date; degree level.
Example for CPT:
4.d. List all previous OPT approvals using this format: OPT Authorization as the title; whether
the authorization full-time (more than 20 hours per week); part-time (20 hours or fewer
per week; SEVIS ID number; employment start and end date; degree level.
Example for OPT:

3. Complete USCIS form G-1145
• This is an optional form. Use this form to request text and email notification(s) regarding your
application.
• Download the form at https://www.uscis.gov/g-1145
• Complete the form with a computer. If you handwrite your answers, use black ink.
• Print the form
4. Make copies of all required documents:
• OPT I-20 (page 1 and page 2)
• All previous I-20 forms (page 1 and page with travel validation – this can be page 2 or 3) issued
by George Mason University
• Passport biological page, showing your photo and passport expiration
• U.S. entry visa, even if expired
• I-94 printout (https://i94.cbp.dhs.gov/i94)
• If applicable – any previous EAD cards from George Mason or previous schools.
• If applicable – Change of Status I-797 approval notice (if you change status to F1 in U.S.
5. Purchase New Official Photographs
The photographs must meet the specifications of the U.S. style passport photos. See Appendix B, Photo
Requirements for additional detailed instructions.
• The photographs must be 2” by 2” and taken within the past 30 days. Do NOT use older
photographs.
• USCIS has been examining photographs more strictly. OIPS recommends that students have their
photos taken professionally. Recently, students have been visiting the following locations to
obtain their photos: the Post Office (select Post Office locations offer photo services for $15. Call
ahead to find out if your Post office has this service) and FedEx Kinkos (University Mall). Usually
the Post Office and FedEx Kinkos will cut the photographs for you. If they hand you a sheet of
photographs (attached together), please ask to them to cut the sheet into individual photographs.
• Using pencil or felt pen, write your name, date of birth and SEVIS ID number lightly on the back of
each photograph.
• Place the two photographs in an envelope or sealed plastic bag.
• Do NOT staple the two photographs.
6. Prepare your OPT application fee
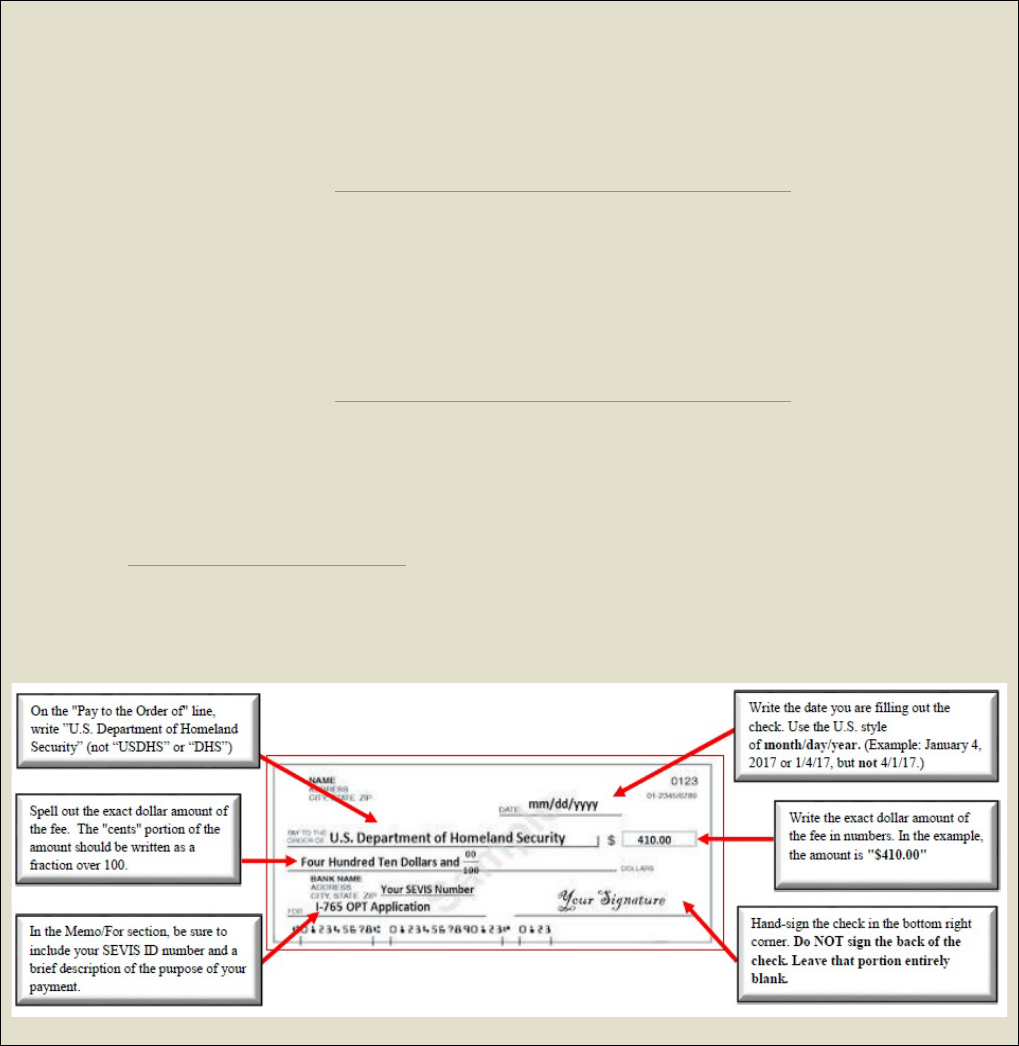
You can pay by check, money order or credit card
• Credit card:
o Review instructions at https://www.uscis.gov/forms/paying-uscis-fees (Scroll down to the
section “How to Pay with a Credit Card”).
o Print out and complete form G-1450 with credit card information and sign
o If you experience trouble downloading/printing the form G-1450, try using the browser
Firefox
• Personal check or money order:
o Review instructions at https://www.uscis.gov/forms/paying-uscis-fees
o If applicable – purchase a money order at a bank, post office, or grocery store.
o Make your check or money order payable to “U.S. Department of Homeland Security.”
o Enter the correct amount of payment on the check or money order. The current fee is $410,
but we recommend that you verify the fee at the time of your application
(https://www.uscis.gov/i-765)
o Make sure a name and address are printed on the check or money order.
How to Fill out a Personal Check:
7. Review your STEM OPT application
• Two color passport-style photographs with name and date of birth printed on back. Click here to
view photo requirements.
• Check, money order or Credit Card Form (G-1450) made payable to U.S. Department of Homeland
Security. Fee: $410
• USCIS Form I-765.
• USCIS Form G-1145. USCIS will send you a text message or email when they receive your
application
• One photocopy each (NOT originals!!) of pages 1 and 2 of your STEM OPT Extension I-20 issued by
OIPS and pages 1 and 3 of all previously issued I-20 forms, front page and signature page, in
reverse chronological order (most recent I-20 first)
• One photocopy of identity and expiration page(s) in your passport (your passport must be valid)
• One photocopy of US visa and I-94 card
• Photocopy of your EAD card (front and back) and any previously issued EAD card(s) and mailer
that came with it
• Copy of job offer letter or pay stubs from employer
• Proof of degree: official or unofficial transcripts or copy of diploma with program of study
listed. You may order an official transcript from the Registrar's Office.
• Optional but recommended: a letter from employer stating how employment is related to you
program of study
Recommended Packet Review:
After you have prepared all your documents, you have the option to meet with an OIPS advisor to review
your OPT application before mailing it to USCIS. This step is not required but recommended.
• For a quick packet review, visit OIPS during walk-in hours (Tuesday, Wednesday, Thursday,
2-4 pm)
• For help with more questions, schedule an appointment with an OIPS advisor (Tel: 703-993-2970).
Do not forget to bring your complete OPT application (USCIS forms + all other required documents)!
Make copies of your complete OPT application (forms and all
supporting documents, including check) for your personal records
before you mail your application to USCIS.
USCIS must receive your complete OPT application no later than 30 days after the OPT I-20 has
been issued. You can find your OPT I-20 issue date on the OPT Acknowledgement Cover Sheet,
attached to your I-20. Additionally, the latest date USCIS will accept your application is 60 days
after your program completion date.
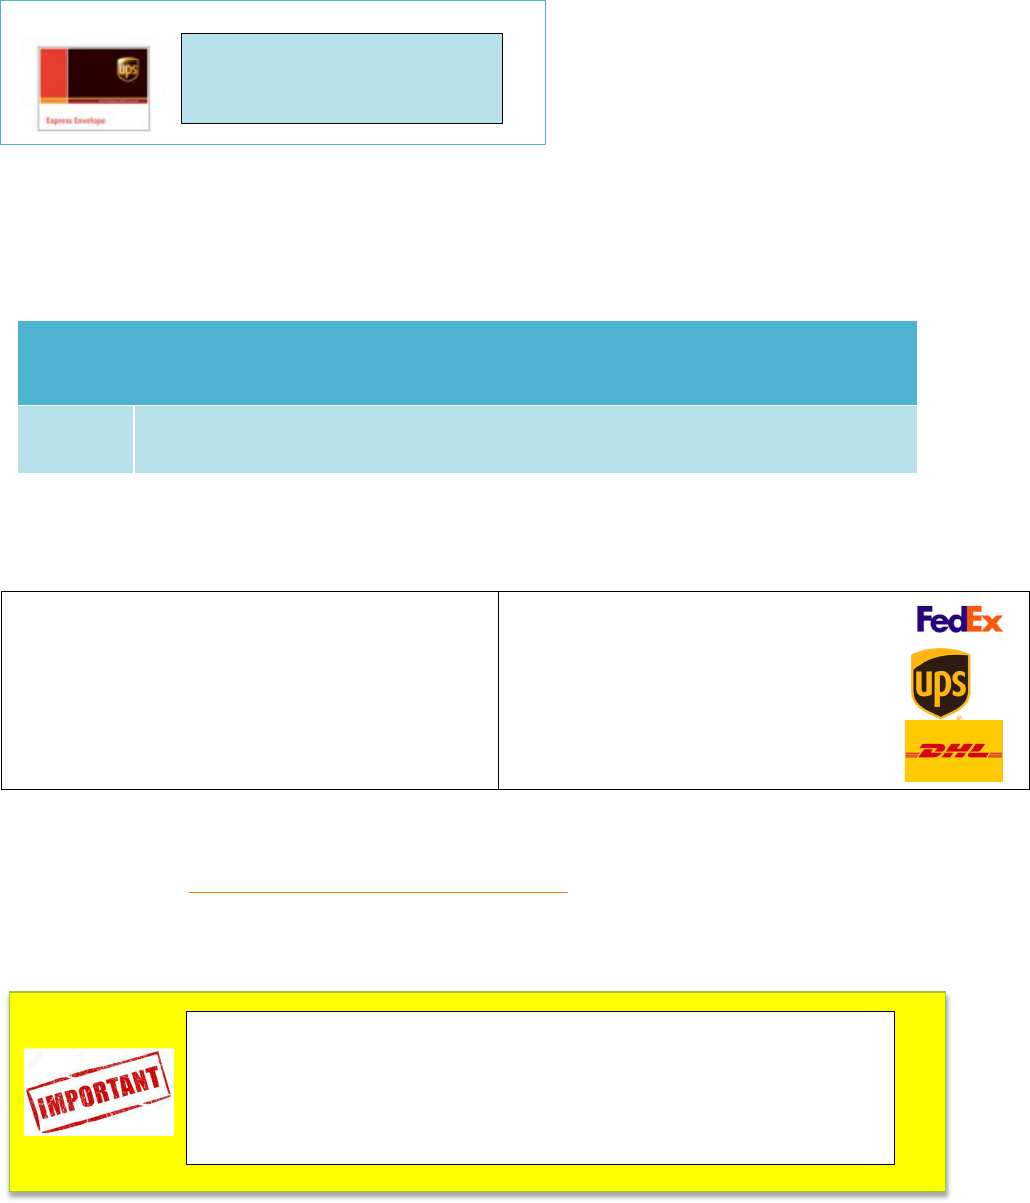
USCIS Mailing Addresses for people who live in Virginia, District of Columbia and Maryland: *
You should use express mail to
ship your OPT application to
USCIS
This will allow you to track the
delivery of your OPT application
USCIS
Attn: AOS
2501 S. State Hwy. 121 Business
Suite 400
Lewisville, TX 75067
* If your address on the I-765 is not in Virginia, District of Columbia or Maryland, you may have to mail
your OPT application to a different address. You can find the complete list of U.S. states and USCIS mailing
addressed online at https://www.uscis.gov/i-765-addresses
(scroll down to the bottom of the page).
Click on
the box
when step
is completed
Step 4 Checklist: Mail OPT Application to USCIS
☐
1. Mail your OPT Application to the correct mailing address depending
on your current residence
If you delay mailing the packet to USCIS, you must meet with an advisor
and request a new I-20 with a new recommendation date. You cannot
simply request a reprint of the original OPT I-20. The advisor must
withdraw the original OPT recommendation and issue a new one. The
processing time for a new OPT I-20 is 7 -10 business days.
Mail OPT application
to USCIS
If you included the USCIS form G-1145 with your OPT application, you will receive a text or email
from USCIS after they have received your application. Approximately 2-4 weeks after USCIS has
received your application, you will receive an I-797C receipt in the mail. This receipt will have a
case number and will allow you to check the status of your application online.
Click on
the box
when step
is completed
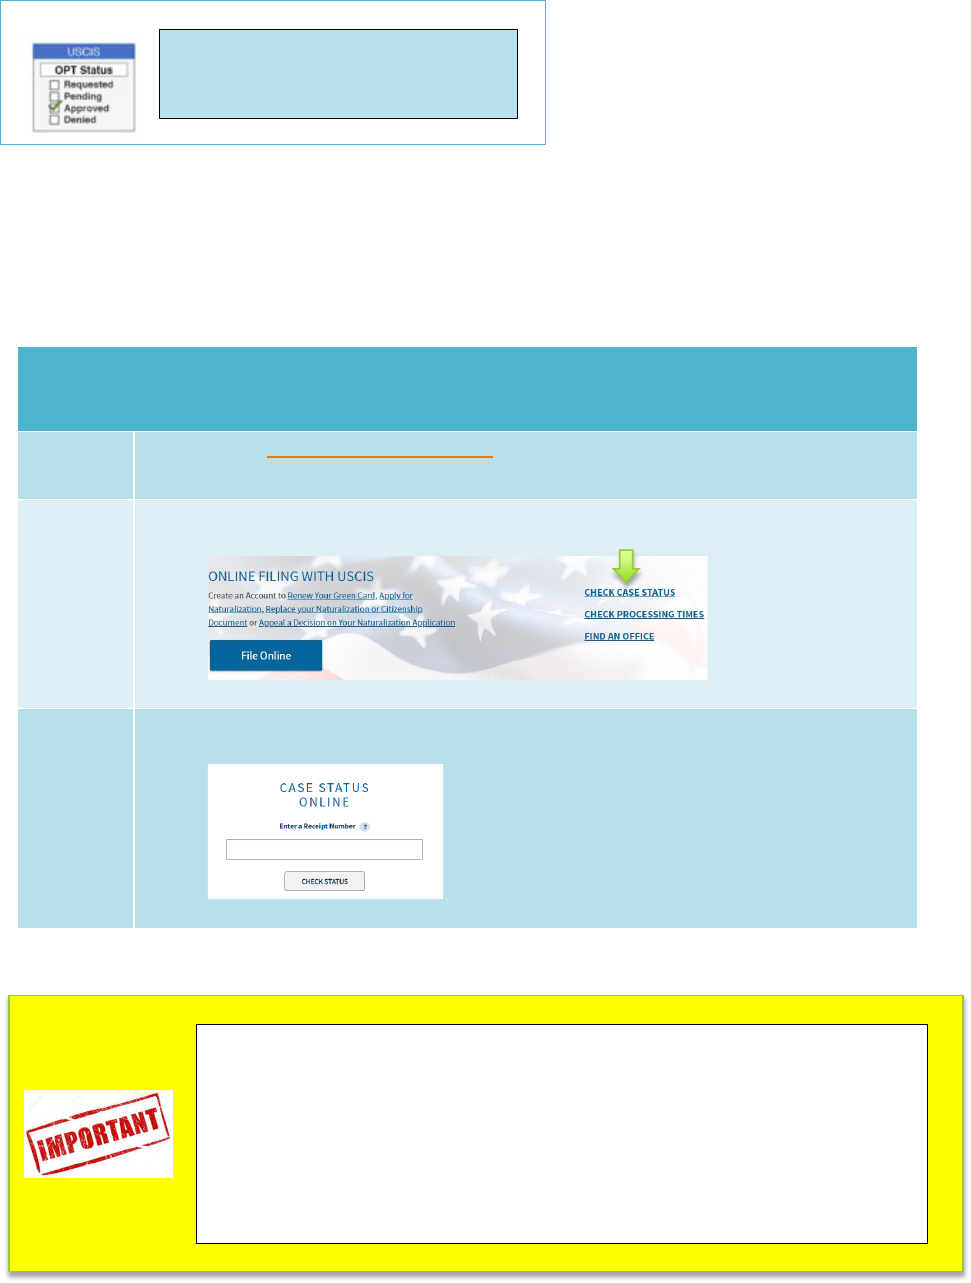
Step 5 Checklist: Check your OPT Application Status
☐
1. Go to http://www.uscis.gov
☐
2. Click on the “Check your Status”
☐
3. Enter your case number (listed on the I-797C receipt):
Check your
OPT Application Status
USCIS will take about 90 days to evaluate your application and issue
your OPT Employment Authorization Document (EAD) Card. If you
fail to submit a required document, the process might take longer. If
your case number has not changed to “approved” after 90 days, you
should call the Customer Service Number listed on the I-797C
receipt. If you are unable to resolve the matter directly with USCIS,
please schedule an appointment with an OIPS advisor.
Note: USCIS does not regularly update cases statuses for OPT. Once your application has been
approved, typically, the case status will skip from “received on mm/dd/yy date” to “approved on
mm/dd/yy date.” Once your case status is “approved,” it will take another 7-10 days before you
receive your actual EAD card in the mail.
Once you have received your EAD card, please notify OIPS.
Click on
the box
when step
is completed
Step 6 Checklist: Provide a copy of your EAD card to OIPS
☐
1. Review your EAD card to make sure the information is accurate. If it
is not, contact OIPS.
☐
2. Submit a copy of your through the OPT Employment Update form:
https://oips.gmu.edu/opt-employment-update-form/
Provide a copy of your
EAD card to OIPS
You may continue working for your employer and update your
I-9 for up to 180 days once you receive the I-797 Receipt Notice
from USCIS.
It is your responsibility to keep records of your employment and any periods of unemployment as
well as report to us every 6 months. If you move to a new address or change your name, notify
OIPS within 10 days.
Click on
the box
when step
is completed
Step 8 Checklist: Report Address Change and
Employment Information to OIPS
☐
1. Go to http://oips.gmu.edu
☐
2. Select the “OPT/STEM OPT Employment Update form” under
Popular Links:
☐
3. Enter all required information.
Report Address Change and
Employment Information
to OIPS
You have an additional 60 days of unemployment under the
STEM OPT Extension (90 days under OPT+60 under STEM=150
days) The total days of unemployment on OPT will be
automatically calculated in your SEVIS record.
3. Appendix A: Sample Completed I-765 – Does not Fit ALL student scenarios
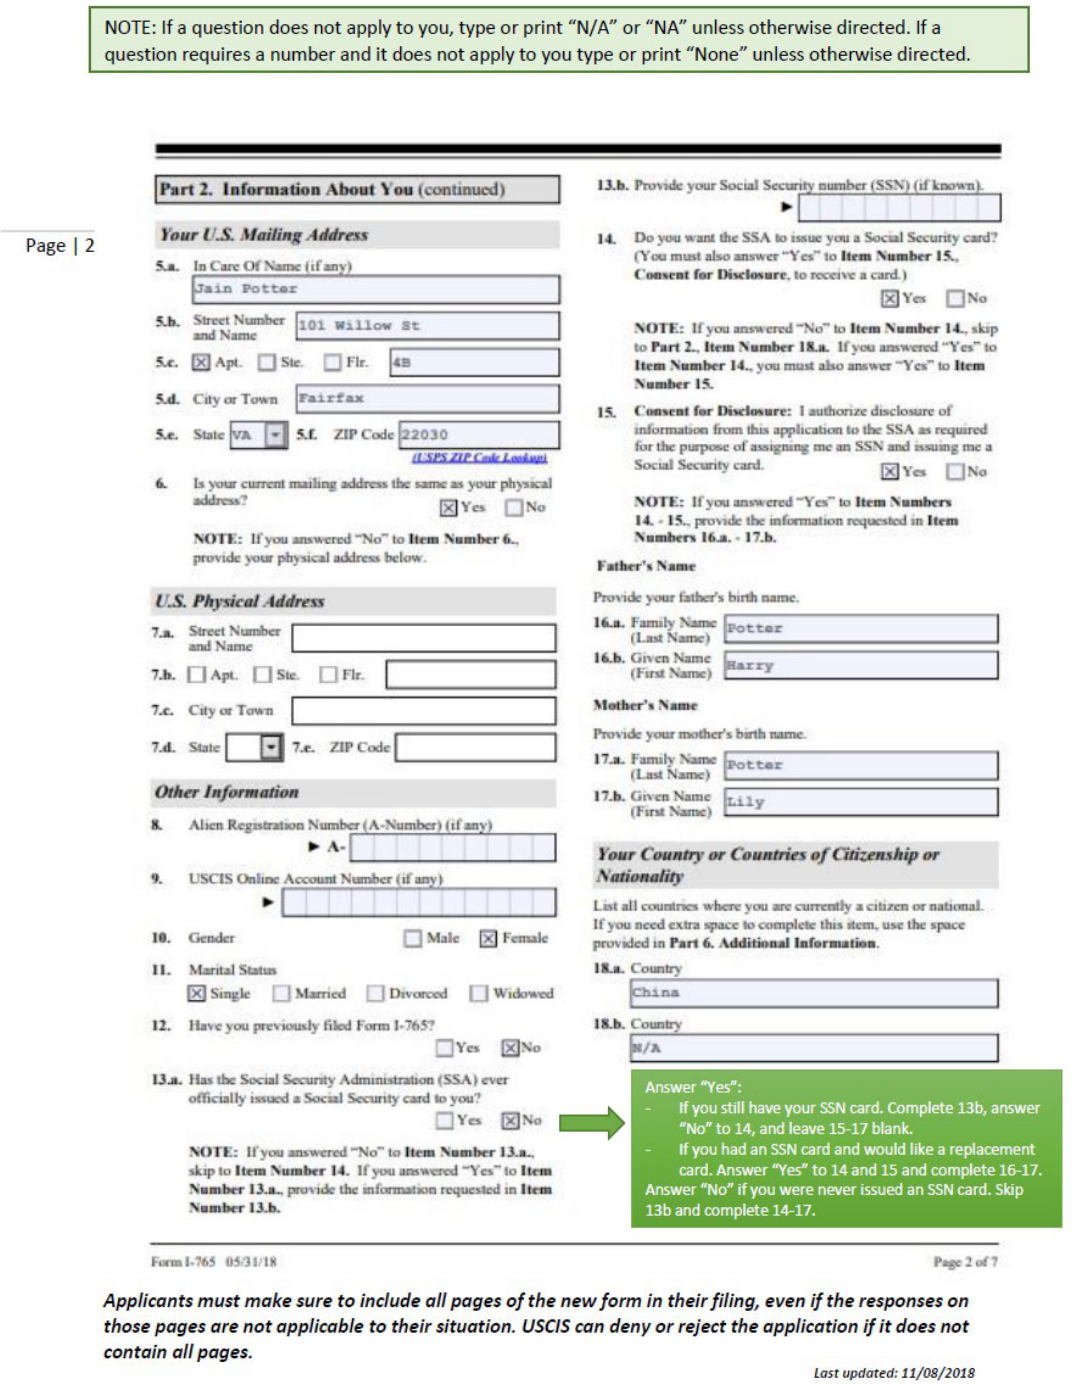
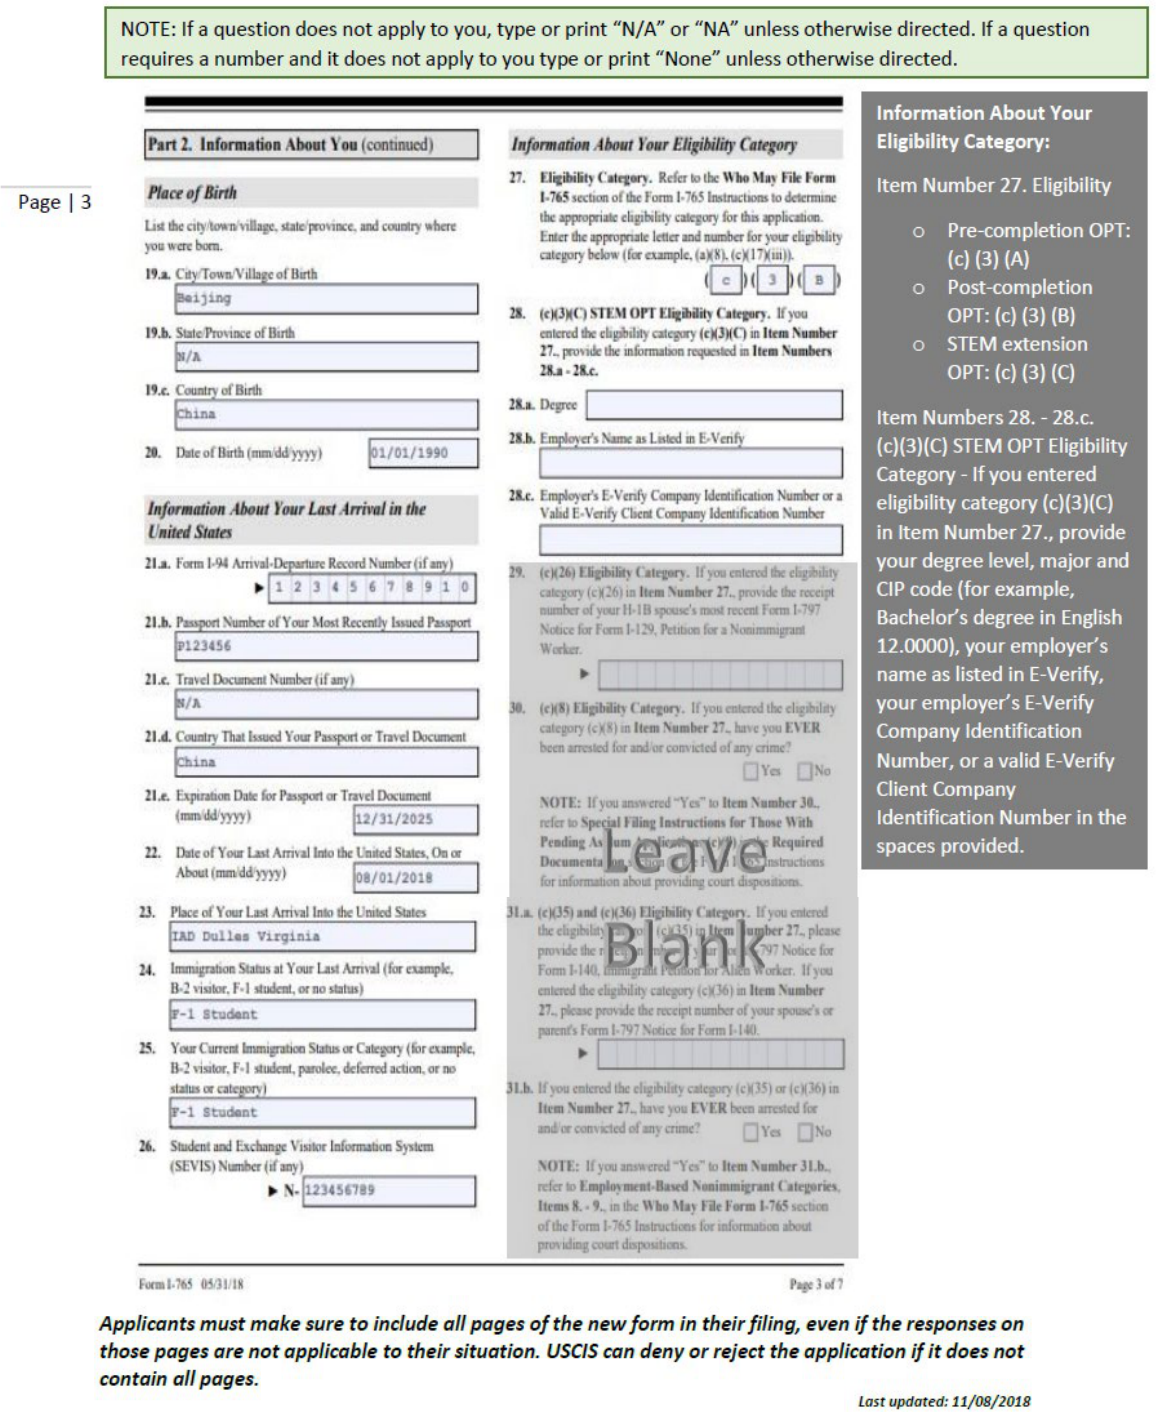

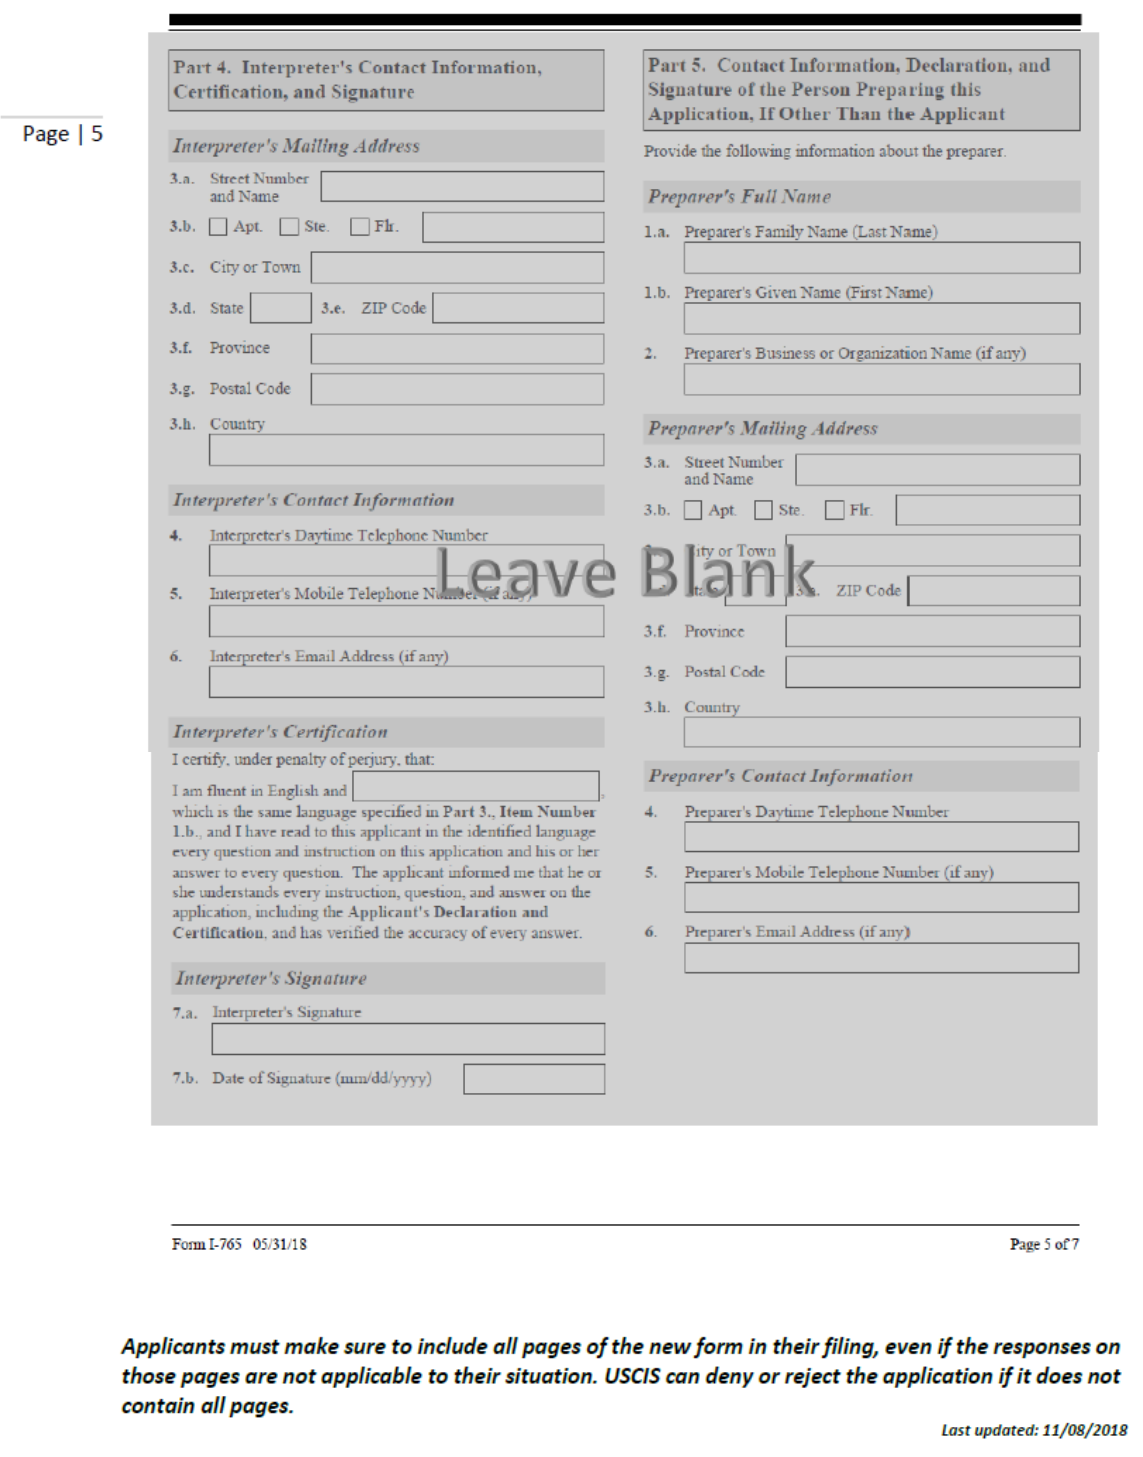
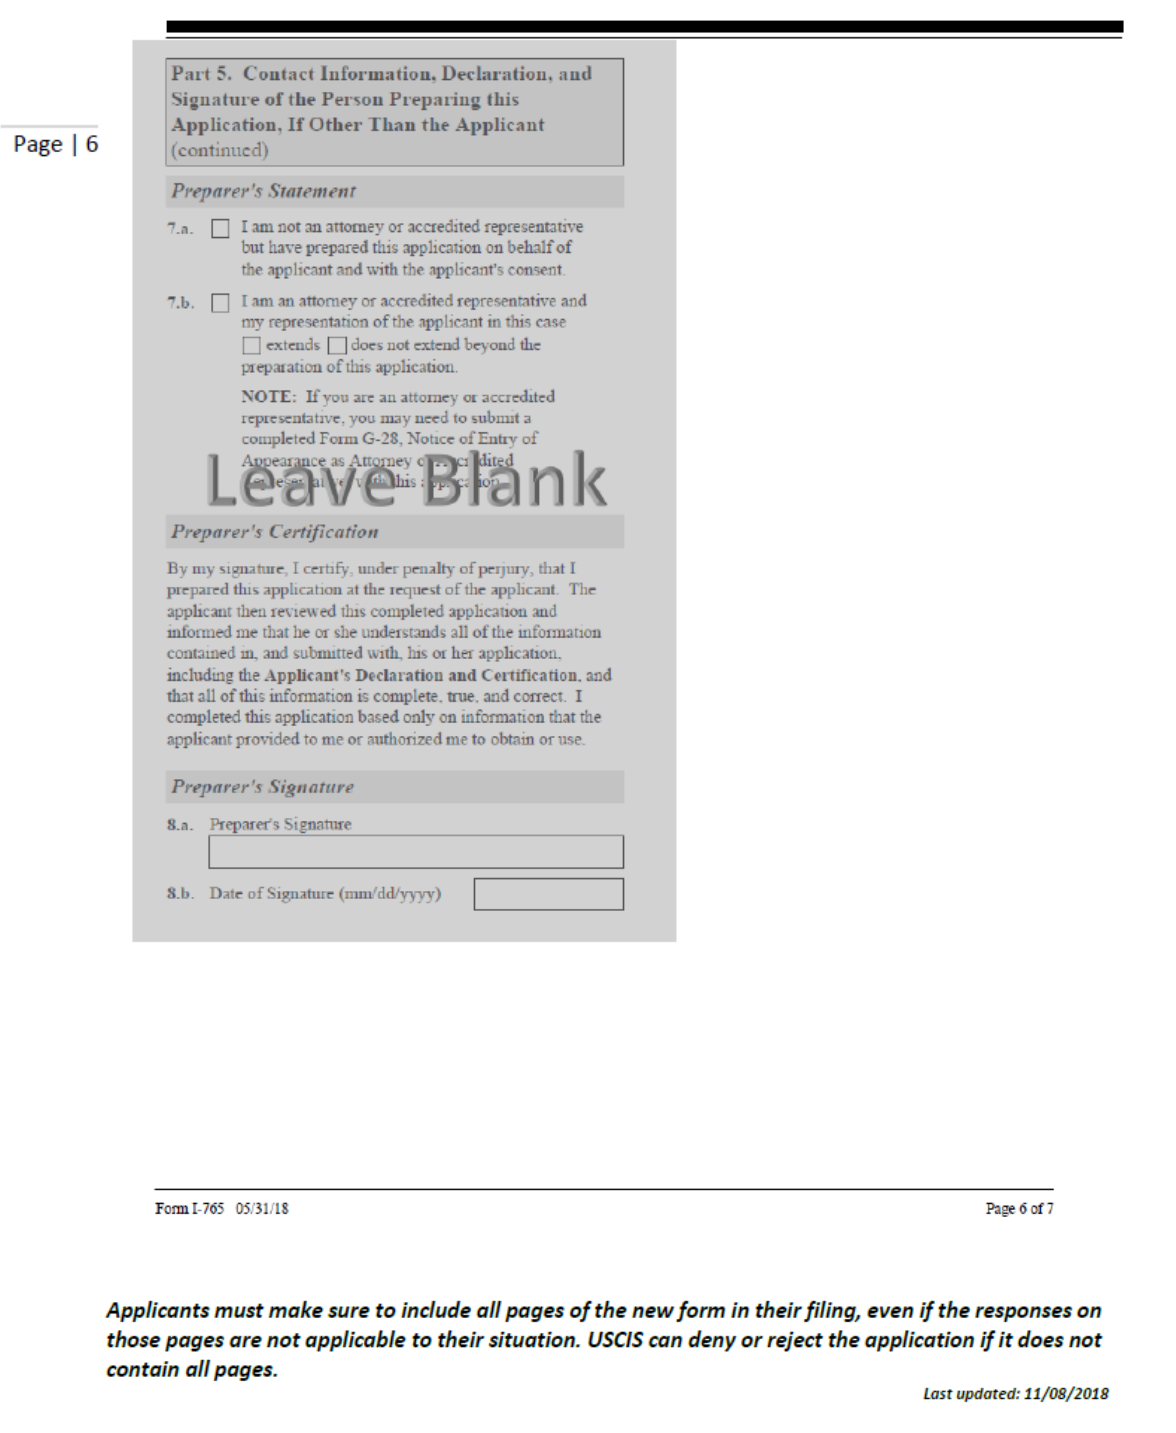
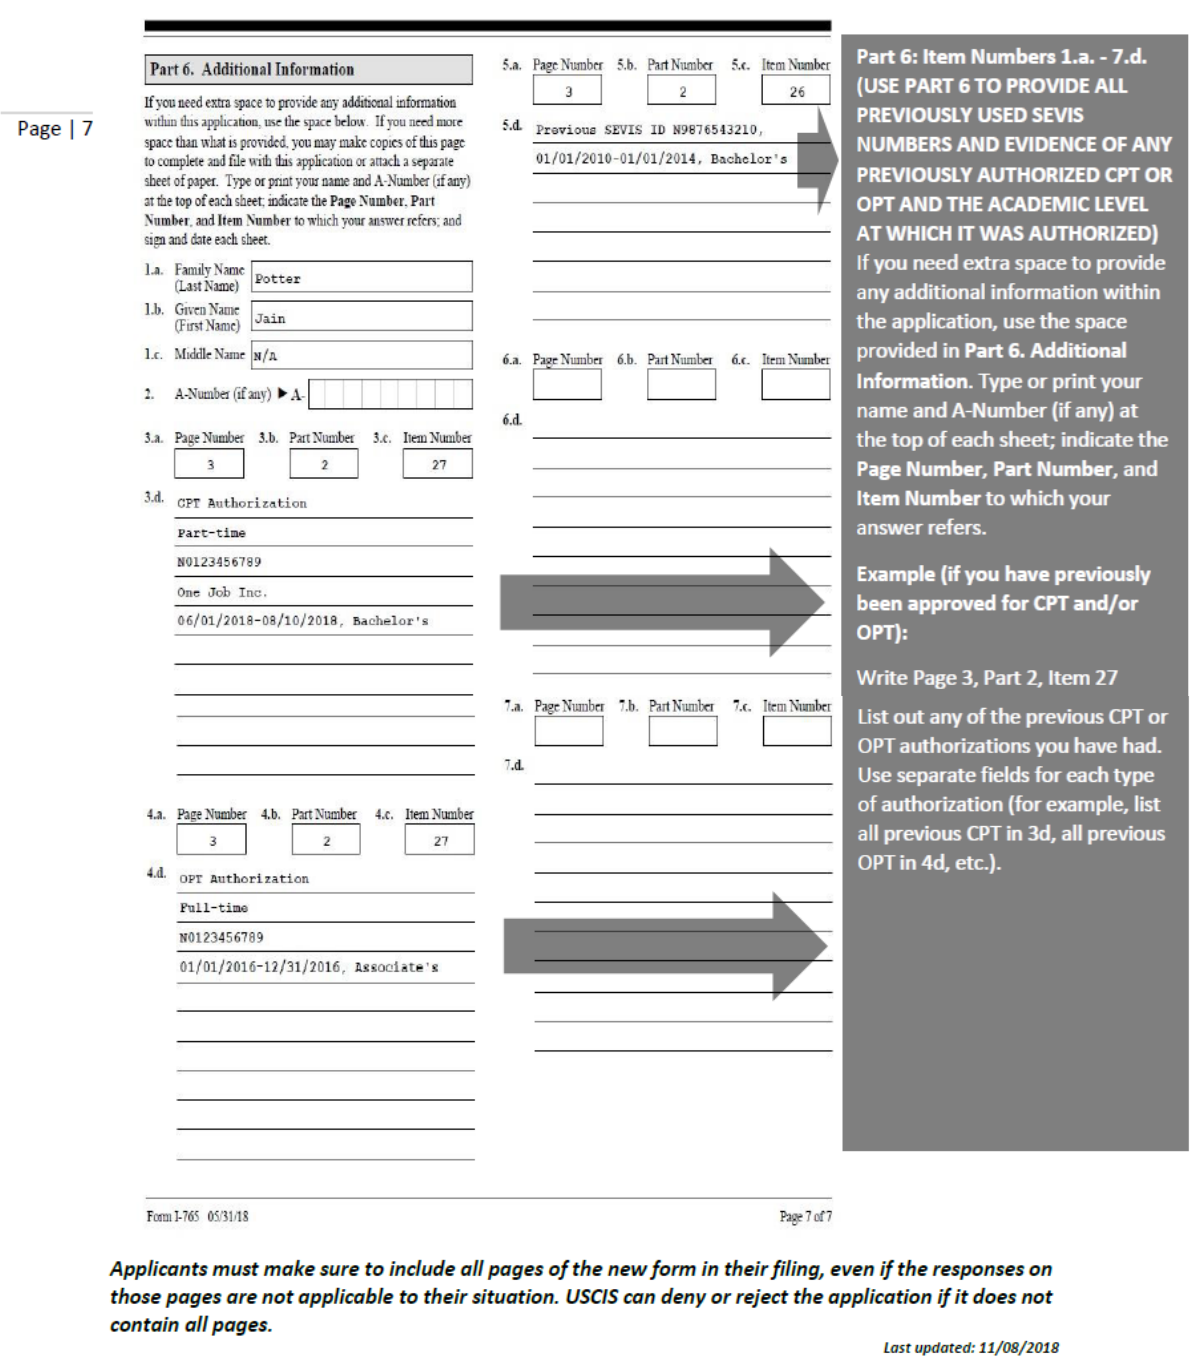

Photo Requirements
Your photo is a vital part of your application. To learn more, review the information below on
how to provide a suitable photo. Digital images are required for some visa categories, while
photos are required for other visa categories. The acceptance of your digital image or photo is
at the discretion of the U.S. embassy or consulate where you apply.
We recommend you use a professional visa photo service to ensure your photo meets all the
requirements.
Your photos or digital images must be:
• In color
• Printed on matte or glossy photo quality paper
• 2 x 2 inches (51mm x 51mm) in size
• Sized such that the head is between 1 inch and 1 3/8 inches (22 mm and 35 mm) or
50% and 69% of the image's total height from the bottom of the chin to the top of the
head. View the Photo Composition Template for more size requirement details.
• Taken within the last 6 months to reflect your current appearance
• Taken in front of a plain white or off-white background
• Taken in full-face view directly facing the camera
• With a neutral facial expression and both eyes open
• Taken in clothing that you normally wear on a daily basis
• Uniforms should not be worn in your photo, except religious clothing that is worn daily.
• Do not wear a hat or head covering that obscures the hair or hairline, unless worn daily
for a religious purpose. Your full face must be visible, and the head covering must not
cast any shadows on your face.
• Headphones, wireless hands-free devices, or similar items are not acceptable in your
photo.
4. Appendix B: OPT Photo Requirements
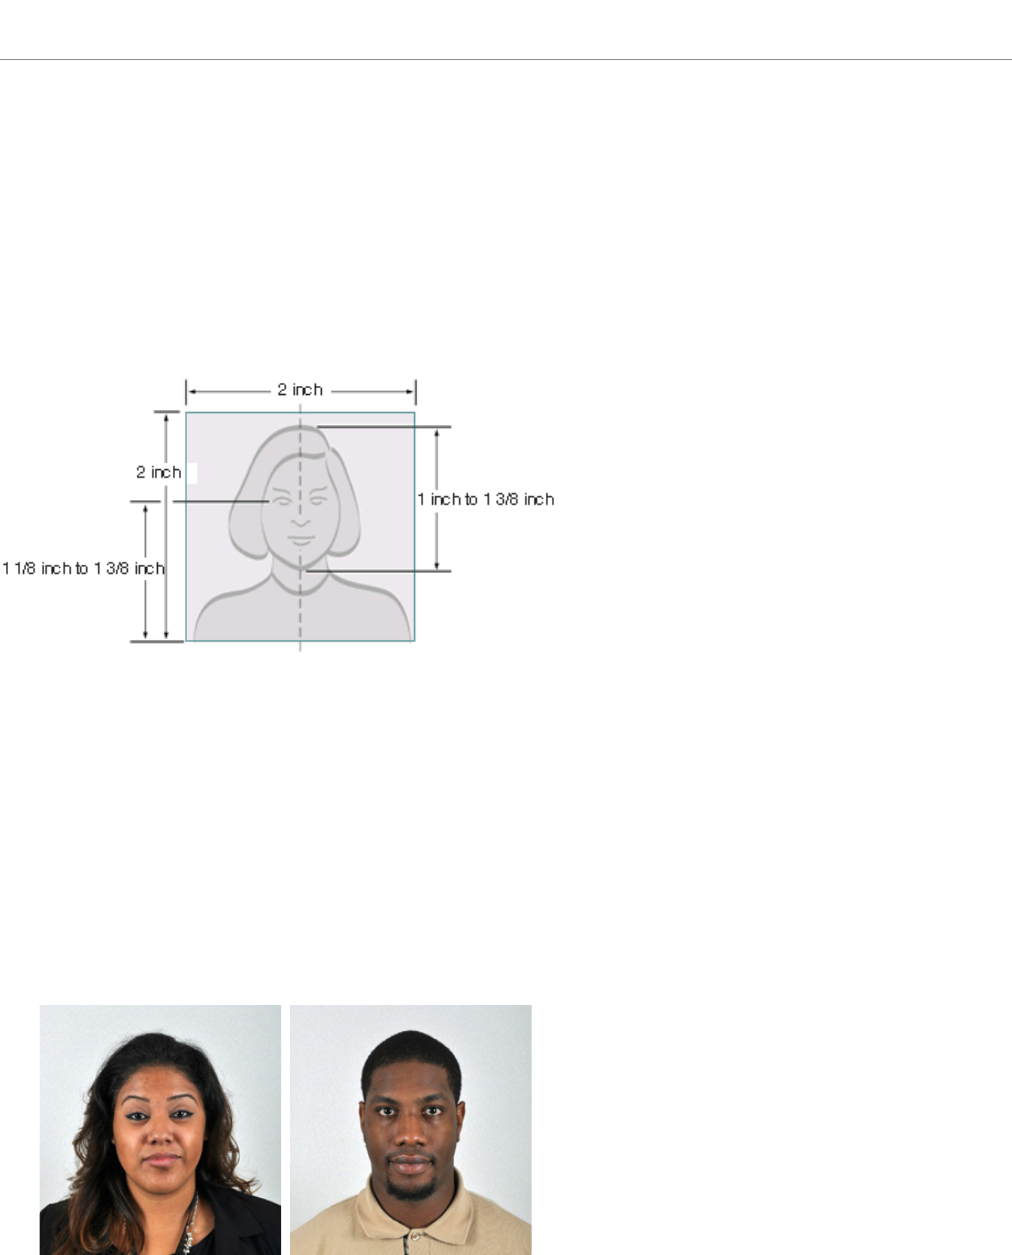
Photo Composition Template
• Make sure the photo presents the full head from the top of the hair to the bottom of the
chin
• Center the head with the frame
• The person in the photo should have a neutral expression and be facing the camera
Paper Photo Head Size Template
• Photo must be 2 inches by 2 inches
• The height of the head (top of hair to bottom of chin) should measure 1 inch to 1 3/8
inches (25 mm - 35 mm)
• Make sure the eye height is between 1 1/8 inches to 1 3/8 inches (28 mm – 35 mm)
from the bottom of the photo
Well Composed Photo Composition Examples
